Hi everyone. I hope you have had a very productive, crafty weekend!
Following my post about my chevron pillow/cushion cover, I’ve received emails asking me how I made it. So I thought it would be a good excuse to make more covers and write a tutorial at the same time. My cover is quilted through three layers on the front and is fully lined. The closure is an envelope style. I’m sure many of you already make covers in your own way but this is my way. I like it because it doesn’t require buttons or zippers, though you could add them if you wish. Also, there are no fabric scraps left.
Here is my chevron version again, in case you missed it.

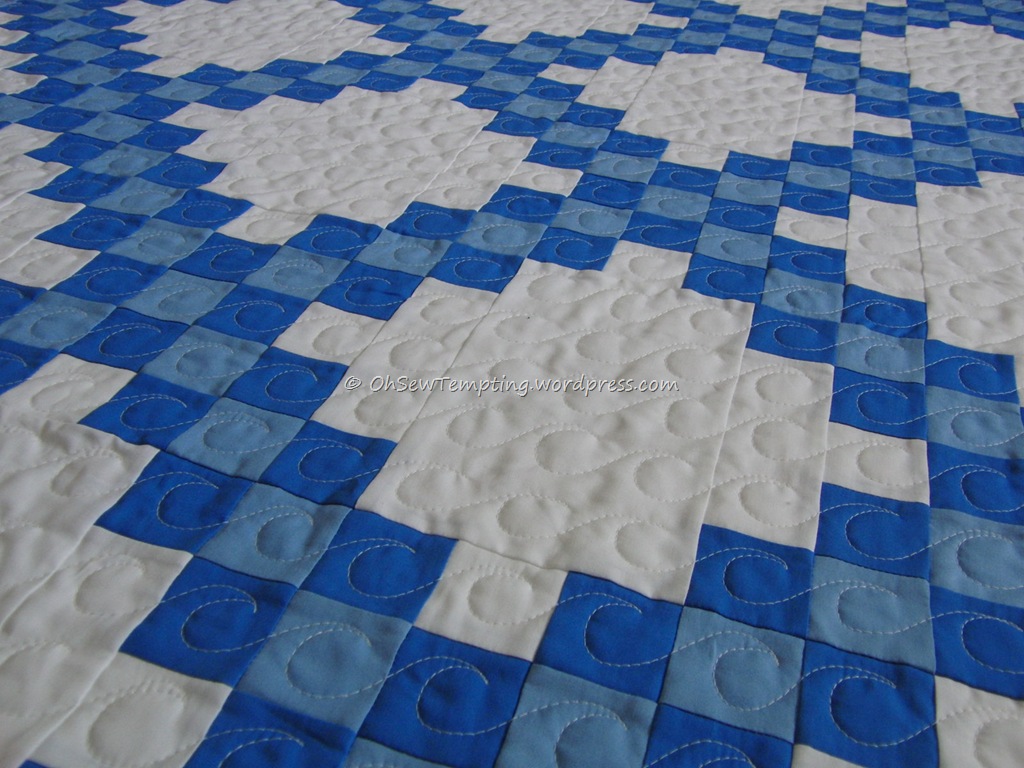
And the quilting.

Here goes….
Materials
You will need: 19.5 inches (half a metre) off the roll of each of the fabrics for the outside of the cover and the lining, assuming that it is 42 inches wide. Also, a piece of wadding/batting which is about 21 x 21 inches.
Method
1. Cut the selvedge edges off both sides of both pieces of fabric. I chose bright orange with white spots for the outer fabric and white lining.

2.Lay the lining fabric to one side. Cut a square which is 19.5 x 19.5 inches from the outer fabric. Cut the remainder in half to give two rectangles measuring 19.5 x 12 inches approx. If yours is slightly bigger than 12 inches, that’s fine. It will give a larger overlap on the envelope closure.
3. Repeat with the lining fabric to obtain exactly the same sized pieces as you did for the outer fabric.
4. Take one rectangle of each fabric and place them right sides together.

5. Sew a one quarter inch seam along one 19.5 inch side. Repeat with the other two rectangles.

6. Lay these pieces on the pressing board with the outer fabric uppermost and the new seam at the top. Lift the uppermost fabric and press away from you so the seam is pressed towards the outer fabric.

7. Now put the rectangles with wrong sides together and press along the seam so that the outer fabric is just peeping around the edge. This is so that the lining cannot be seen from the back closure of the finished cover. Repeat with the other rectangles.

8. Now we are going to make the quilted front of the cover. Lay the wadding/batting flat on the table. Place the wrong side of the lining square on top of the wadding. Make sure it is lying square and smooth it out.

9. There should be a small amount of wadding all around the edge of the lining which you should trim away so they are both the same size.

10. Carefully, turn the double layer square over and place the outer fabric on top. You should now have lining on the bottom, wadding in the middle and the outer fabric on top.

11. Sew along one side through all three layers, close to the edge. This will anchor this side ready for quilting. Place pins at intervals through all layers.

12. Quilt as desired. For this cover, I folded my square in half and sewed a line along the fold from the stitched edge to the opposite side. I then attached my little gadget to the machine so that I could sew lines parallel to the first one at intervals of 1.5 inches.

13. I then folded my square in half diagonally, sewed a line along the fold and repeated the paralell lines process.

14. Now, all we need to do is sew all of the pieces together to make the cover. Lay the quilted square on the table with the right side uppermost. Place one of the rectangles with the lining uppermost at the edge of the square. Pin in position.

15. Now pin the other rectangle to the other side of the square. If you are using fabric that has a pattern with a right way up, now is the time to change positions if you need to. Don’t wait until after it has been sewn together.

16. Sew all the way around the cover through all layers. Take care to stitch slowly over the thicker parts where the fabrics overlap. If you have a serger, this stage will be much faster as you will be able to sew a seam and overlock the edges at the same time.

17. I don’t have a serger so I switched to zig-zag stitch and sewed around the outside edge of the seam. Trim the edge and snip across the corners.

18. Turn the cover to the right way, press the edges and insert a pad. Stand back and admire  .
.
Here is my finished cushion. I hope you like it.

I couldn’t stop!

I quilted this one with another different pattern, keeping it simple.

Here they are all together.

Go on then, have a go. Send me photos if you make one and I’ll put it here with mine. Any questions, just ask. I’ll also be putting this tutorial on my quilting blog Oh Sew Tempting as it is quilting after all .
Last but not least, I’ve just noticed that the October Made It Challenge has begun over at Woolhogs. Entries are already coming in. Pop over to take a peep!
Have fun!
Avis x