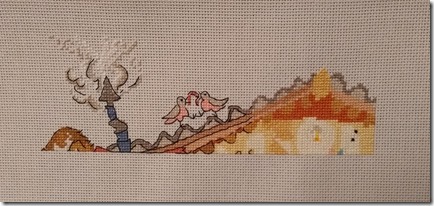
Here is my update on the Cut Thru Garden Shed cross stitch. Designer credits are here. If you need a reminder of how it’ll all turn out in the end, you’ll find a photo in this post.
This is where I was up to last time.
I continued working along to the right. Here it is before the back stitching was done.
 Here it is with the back stitching all finished.
I’ll keep going across the top of the roof line for next time. Back down the other side of the sloping roof to the right will mean a smaller amount to stitch but the more stitch intensive sections will be here in no time. I’m not in a hurry to finish this one.
As usual, it’s worth hopping around the rest of the lovely SAL blogs by clicking the names below. You never know, you might be inspired to make something too. We live all over the world so you may need to allow for time differences. Posting takes place every third Sunday, local time.
Our next updates will be posted on the 23rd December 2018.
Avis, Claire, Gun, Carole, LucyAnn, Kate, Jess, Sue, Constanze, Debbierose, Christina, Kathy, Margaret, Cindy, Helen, Steph, Linda, Heidi, Jackie, Sunny, Hayley, Tony, Megan, Catherine, Deborah, Connie, Clare
About the SAL
This SAL (Stitch Along) is slightly different to other SALs in that we don’t all stitch the same design at the same rate. We choose ONE unfinished project, or ONE new one, and show progress of its completion over a series of three weekly updates. There are no deadlines and no set amount to stitch. The result is that the space in our drawers full of WIPs (works in progress) is gradually being freed up to store lots of new crafty goodness. It’s surprising how much motivation I’ve gained from being in this SAL. If you’d like to finish a project you’ve left unfinished for a while, or start a new one with us, you can join us by leaving a request in the comments below or sending me an email. The address is on the right of this page. I’ll send you a few simple rules to agree.


Debbierose
/ December 2, 2018adorable cut through, I look froward to seeing this grow.
Sewing Beside the Sea
/ December 17, 2018Thanks. Slowly but surely. I like to do other projects along side.
witchylin
/ December 2, 2018These ‘cut thru’ designs are fun. I love the ones you have already completed so I will be watching this one taking shape with interest.
Sewing Beside the Sea
/ December 17, 2018Thanks. I love them too 🙂
katechiconi
/ December 2, 2018I’m so glad you’re backstitching as you go, it makes everything jump into focus beautifully!
Sewing Beside the Sea
/ December 17, 2018Yep, it’s all a blur otherwise. Designers are so clever!
Clare
/ December 2, 2018Nice to see that back stitch shows more detail. lovely.
Sewing Beside the Sea
/ December 17, 2018It brings everything to life doesn’t it?
claire93
/ December 2, 2018as always, your idea of cutting the chart into pièces is working for you, to make good steady progress. And great idea to complete backstitch as you go!
Sewing Beside the Sea
/ December 17, 2018I don’t know how I could be bothered to do all the back stitch at once on the previous two. I must’ve had more patience a few years ago.
claire93
/ December 17, 2018I think I had more patience a few years ago too ^^
nanacathy2
/ December 2, 2018I have no idea what cut through is but it looks very sweet.
Sewing Beside the Sea
/ December 17, 2018Cut Thru just means cross-section I suppose. If you Google “Bothy Threads Cut Thru” you’ll see all the designs are cross-sections of buildings or modes of transport. There’s loads of different ones. I’ve already stitched the camper van and the narrow boat and could happilly make them all.
Carole
/ December 2, 2018Love the way the backstitch makes it all come to life. I’d definitely do it as I went along too 🙂
Sewing Beside the Sea
/ December 17, 2018Yes, it’s nice to know I won’t have loads to do at the end.
stitchingranny
/ December 2, 2018I think with this one you need to bs as you go, if left till the end I am sure you would lose the will to live whilst tackling it as there is obviously an awful lot of it. However it does make such a difference once its added.
Sewing Beside the Sea
/ December 17, 2018I left the back stitching until the end on two previous designs in this series and didn’t mind at the time. Now, I wouldn’t even think of leaving it for later. This is the way to go from now on for me.
teamwilsun
/ December 2, 2018I love your “mini finishes” — and I love that you’re doing the backstitch as you go. The details on this piece are so wonderful — that lovely little light bulb filament! — that it will we a joy to watch as it keeps growing!
Sewing Beside the Sea
/ December 17, 2018Thanks, it’s nice to see the details popping as I go 🙂
Connie Butner
/ December 2, 2018This is really cute and I love the way you are stitching, one section at a time totally complete. I am trying to do that – I get sidetracked when I am using a color that also needs to be somewhere else – I go stitch that place as well!
Sewing Beside the Sea
/ December 17, 2018Ah, well the trick is to copy and then cut up the chart and only keep the bit you are working on nearby. That way you’ll only stitch what’s within that particular section. If I didn;t put the other sections away I’d be tempted to finish a piece of thread.
lbick
/ December 2, 2018Looks great so far. I’m sure you’ll be glad you did the back stitching now instead of at the end. Looks like there is a lot of it in this project.
Sewing Beside the Sea
/ December 17, 2018Absolutely. It’s been a lot of fun so far.
wybrow1966
/ December 2, 2018This looks like quite a bit of progress and I love all the little details.
Sewing Beside the Sea
/ December 17, 2018Thanks. Me too 🙂
magpiesue
/ December 2, 2018When I saw the first picture this morning it looked to me like a sinking ship! All that detail work really brings even a small section to life. 🙂
Sewing Beside the Sea
/ December 17, 2018Yep, it makes a huge difference doesn’t it?
Ginny @ Mytimestitching .com
/ December 2, 2018Wonderful start to your Cut through. I will enjoy watching this one come to life.
Sewing Beside the Sea
/ December 17, 2018Thanks Ginny! It’s a lot of fun to stitch 🙂
Christina
/ December 2, 2018Always love how that backstitch makes the design pop! Birds fighting over a worm is so cute too!
Sewing Beside the Sea
/ December 17, 2018There’s two snails coming up on Sunday 🙂
craftycreeky
/ December 2, 2018Very cute, the back-stitching just makes it 🙂
Sewing Beside the Sea
/ December 17, 2018It does. I could never tire of these designs. There’s others waiting in the to-stitch drawer 🙂
rutigt
/ December 3, 2018It´s growing and I love it! 🙂
Sewing Beside the Sea
/ December 17, 2018Me too 🙂 Thanks Gun!
kathyreeves
/ December 3, 2018The whimsical nature of the artwork is wonderful, and each new section is like a mystery unfolding. Love your approach and progress!
Sewing Beside the Sea
/ December 17, 2018It suits me to do it this way. I just like the buzz of a mini finish 🙂
Catherine
/ December 5, 2018Such a fun and cute piece, you’ve made great progress. The backstitching makes such a difference!
Sewing Beside the Sea
/ December 17, 2018Yes, I’m really enjoying stitching this one but I’m rationing my time on it to a couple of evenings every three weeks at the moment. Lots of other things to be getting on with 🙂
JJ Crafts
/ December 11, 2018I can’t wait to see this one grow. It looks like it’ll be a really fun piece.
Sewing Beside the Sea
/ December 17, 2018I like the cartoony style and could happily stitch on this until it’s done but I have other things to do as well.